

Using Fast Attach in Easy-Wire®
Time is money.” Do you agree with Ben Franklin’s adage? Well, if you’ve ever said, “Don’t waste time,” or “Spend time wisely,” you probably do. For most of us, time is precious and we want to use it efficiently. That’s why we can get frustrated when we have to perform the same tedious task over and over again. Naturally, there are some repetitive tasks that we can’t avoid, like commuting to work or brushing our teeth (well, hopefully!). Perhaps you feel the same way about testing your cable connectors? It probably seems like another time-consuming, monotonous chore you just can’t get around.
But what if I told you that you need not lose time doing this anymore? I’m confident that if you knew there was a way to reduce connector attaching and mapping to a mere second, you would want to know how. Cirris has created this very solution: Fast Attach. If you don’t already know what Fast Attach is or how it works, read on . . .
Fast Attach in a Nutshell
Fast Attach speeds up the process of attaching connectors by allowing you to map a connector type to the tester. To begin with, each pin of a connector type is programmed to correspond with a test point in the tester interface. For example, pin A1 might be mapped to test point 1, pin A2 might be mapped to test point 2, and so on.
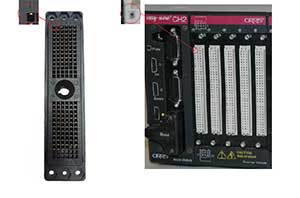
Correct Wiring Pattern of a Fast Attach Connector. The pins of all the connectors are wired to the tester in the same counting order, start in the same relative place, and have the same offset.
Once the ‘map’ for that connector type has been established, it can be used in the future as an address or template for identical connector types. Therefore, instead of having to map the connectors’ pins to the tester interface, our Easy-Wire software will apply the template to the connectors and map the pins automatically. That way, you do not have to probe each pin. This will save you a vast amount of time as well as eliminate human error.
Note: The Fast Attach capability can only be used for connector types/fixtures that are identically wired and have a uniform offset between pins, i.e. all connector types must have the same address/fit the same template
Correct Wiring Pattern of a Fast Attach Connector. The pins of all the connectors are wired to the tester in the same counting order, start in the same relative place, and have the same offset.
Incorrect Wiring Pattern of a Fast Attach Connector. Each connector is wired to the tester in a different pattern or in a different relative starting
position.
How to Use Fast Attach
STEP 1: CREATE A CONNECTOR TYPE
In the Easy-Wire main menu, click Connector Type Library.

2. In the “Connectors (traditional) tab,” click Create Connector.

3. Enter a unique name, such as the part number, to represent the connector.
We have named it “EXAMPLE FIXTURE.”

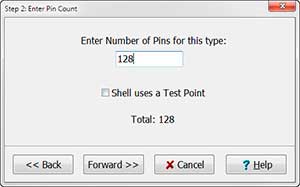
4. Enter the number of pins in your connector.
Ensure all pins attached to the tester are included in the pin count.
5. Enter the first pin name. The first pin name can have up to 10 characters.

6. Choose from the two options below:
If the pin names auto-complete, and if all pins are in the “Pin Names” list, click Forward>>.
If the pin names do not auto-complete, enter the next consecutive pin name in the “Pin Name” text box and click Insert. Repeat until all pin names are in the “Pin Names” list and click Forward>>.
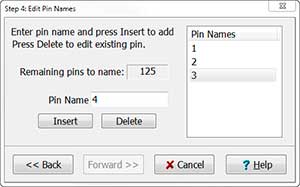
If you want to delete one pin name:
In the “Pin Names” list, click on the pin you want to remove and click Delete.
If you want to delete all pin names:
Click <<Back until you reach the “Enter Pin Count” window.
Enter a new pin count total and click Forward>>.
Enter a new first pin name and click Forward>>.
7. Select a graphics option. This allows you
to draw a representation of a connector.
Note: If you decide not to use a graphic,
you will not be able to create one later. The
graphic can be used in the test program
editor to help you do the following:
Identify a connector.
Recognize which pins in a connector are attached.
Manually add the correct “from” and “to” points when adding instructions to the “Test Instruction List.”
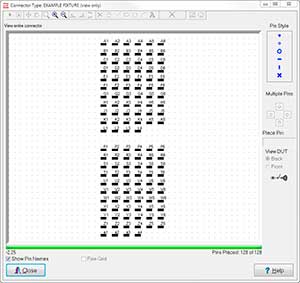
You can create a graphic based on the layout of your connector pins. As
you probe each pin of your connector, the corresponding pin on the graphic
turns red. This helps you keep track of the pins that have and haven’t yet
been probed.
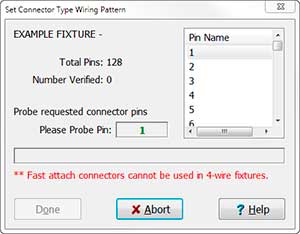
STEP 2: SET THE WIRING PATTERN
1. In the Easy-Wire main menu, click Connector Type Library.
2. Right-click on the connector you created.
When the cursor window opens, point to Wiring Pattern. A sub-menu will open.
Click Set.
3. In the “Set Connector Type Wiring Pattern” window that opens, probe the pins that correspond with the pin names in the Pin
Name list.
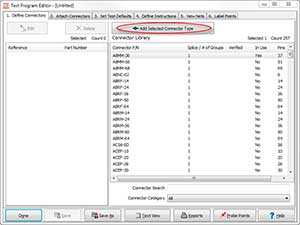
STEP 3: USE FAST ATTACH CONNECTORS IN THE TEST PROGRAM
1. In the Easy-Wire main menu, click
Learn/Create Test Program.

2. In the “Define Connectors Tab” of the “Test
Program Editor” window that opens, select
the connector type you created in Step 1.
The “set” connector or an identically wired
connector should be attached to the tester.
3. Click Add Selected Connector Type.
4. Open the “Attach Connectors” tab.
5. Either click Attach all Connectors with
the probe or highlight the connector type
and click Attach Selected using Probe.

6. Using “View Connectors” as a reference
(the graphic that you drew automatically
pops up in this window when the connec-
tor is attached), probe the first pin on the
connector (as indicated in red). As soon as
the first pin is attached, the rest will instant-
ly attach using the fast attach pattern estab-
lished in Step 1 (the pins on your graphic
will all turn blue to indicate that they are
attached).
