
Install Cirris Networking Made Easy Server software
1. Install Cirris Networking Made Easy Server software.
Run Networking Made Easy Service Install program. This program will guide you through the steps necessary to install Cirris Networking Made Easy Server on a network PC.

The Install Program.
2. Verfy the Installation
The installation program configured the Cirris Networking Made Easy Server as a “Service” and modified the Windows Firewall settings to allow that service access to the network. To verify the Windows Firewall settings on a standard Windows XP Pro system:
- Click the “Start” button
- Choose “Control Panel” then “Security Center”
- Under “Manage Security Settings For” choose “Windows Firewall”
- Click on the “Exceptions” tab
- Verify that “Cirris Networking Made Easy” program appears in the tab
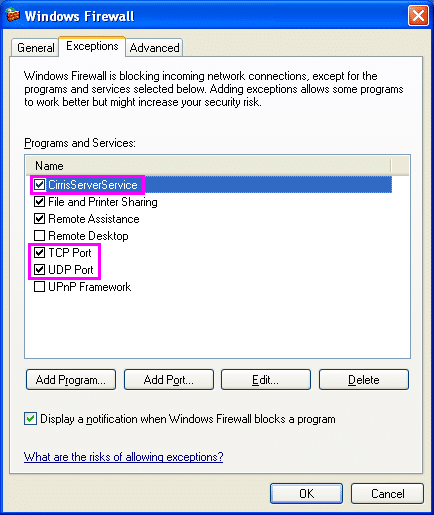
Windows Firewall Changes.
If you are using different Firewall software on your PC you should make sure “Cirris Networking Made Easy” is allowed TCP and UDP access to the network.
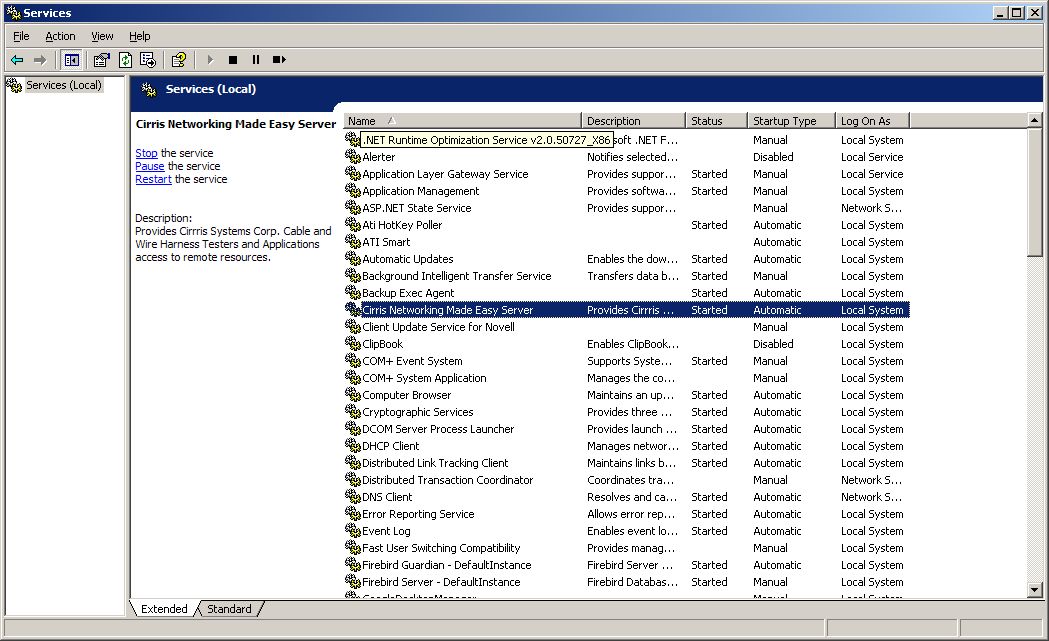
To verify that Cirris Networking Made Easy is a Windows Service:
- Click on the Windows “Start” button
- Choose “Control Panel” then “Performance and Maintenance”
- Under “or pick a Control Panel icon” click “Administrative Tools”
- Double click on “Services” and the Service Window will open
- Verify that “Cirris Networking Made Easy Server” is listed as a service.
Cirris Networking Made Easy Server is configured to start automatically whenever the PC is powered up. The server can be stopped and started from the Service window OR from Cirris Networking Made Easy Utilities.
Windows Services Changes.
3. Run the Cirris Server Utilities Program.
The Cirris Server Utilities program allows you to:
- View the server IP address and status
- Stop and Start the service
- Set the directory that will be used for shared tester files
- Generate the network configuration file needed to connect a Touch1 to the server
To launch the server utilities go to Start – Program Files – Cirris – Networking Made Easy, and click on “Cirris Server Utilities.”

Cirris Server utilities Program.
4. Click “Cirris Server Options” to set the Networking Made Easy options. You can specify the tester file storage directory (along with other options). The directory for tester file storage is the location that all Touch1 testers will use for file access.

Setting the Server options.
5. Create T1 Network Configuration File.
Click “Create T1 Network Configuration File” to generate the file your Touch1 will need. This will allow you to create a file you can import into your Touch1. This file will specify the shared directories along with other information the Touch1 needs for making the connection to the server. You can create multiple sub-directories under the Tester File Directory to organize you files any way you like. Each sub-directory under the Tester File Directory can be “shared” as a drive with it’s own drive letter. Once the file is imported into a Touch1, the “Drive Share” will just look like another drive with the drive letter specified. Fill in the information, then click “Save” on this form and save the file to a floppy disk. Use the floppy disk to import the file into your Touch1.
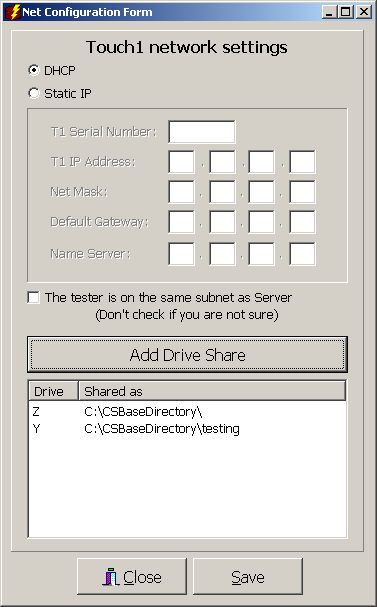
Configuring the Touch1.
Select DHCP if you are on a standard network that has a DHCP server. Select Static IP if you do not have a DHCP server, or want to assign the IP yourself.
If you select Static IP then you must fill in all of the fields.
- T1 Serial Number: To find the Touch1 serial number, go to the Touch1 Main Menu and press twice.
- T1 IP Address: This should be an internally unused IP Address in the range of 192.168.0.1 – 192.168.0.255
- Net Mask: (if unknown, use: 255.255.255.0)
- Default Gateway: (if unknown, use 0.0.0.0)
- Name Server: (if unknown, use 0.0.0.0)
Networking Made Easy – Turn your PC into a Server.