

Digital I/O Part 3: Edits Through Easy-Wire® Software
You can configure Digital I/O for a test program in the “Edit I/O Blocks” window in Cirris Easy-Wire Software. Digital I/O is an optional feature that must first be registered using the Easy-Wire Feature Registration Utility.
To access the Edit I\O Blocks window:
- Register “Digital I/O and Windows Messaging”.
- In the Easy-Wire main menu, select the desired test program and click Edit\View.
- In the Test Program Editor, open the “Set Test Defaults” tab and click Configure Inputs and Outputs.
If buttons are grayed out:
- Make sure the Use I/O box at the top of the “Edit I/O Blocks” window is checked.
- Some buttons may not become active until you select an instruction from the “I/O Instruction Blocks” list.
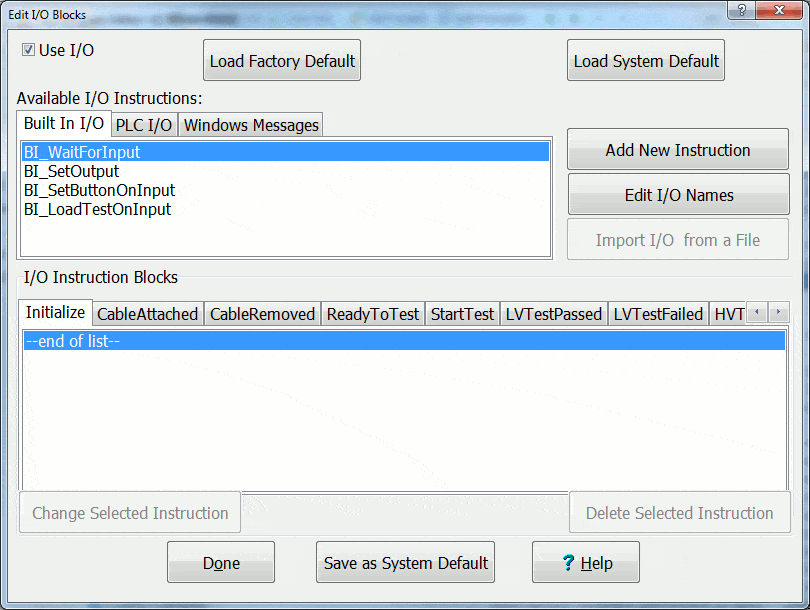
Use I/O
This check box allows you to turn the capability for Digital I/O and Windows Message ON or OFF in a test program. It also activates the buttons in the “Edit I/O Blocks” window.
Load Factory Default
This button allows you to overwrite the I/O instructions in the I/O Instruction blocks section with the factory defaults.
Load System Default
This button allows you to restore the I/O information that was previously saved to system defaults, and overwrite all I/O information currently set. You can also easily copy I/O information from one test program to another.
Available I/O Instructions
This contains the tabs Built In I/O, PLC I/O, and Windows Messages. Only the CH2 and Easy-Touch® supports Built-In I/O. All Easy-Wire testers allow PLC I/O. The same I/O instructions are identical for Built In I/O and PLC . These instructions include:
- WaitForInput: The test system will wait until an input changes to a defined state.
- SetOutput: Change the state of an output to High or Low (see note below for more information).
- SetButtonOnInput: When an input changes to High, a button in Easy-Wire is activated (see note below for more information).
- LoadTestOnInput: Loads and executes a test when an input changes to the desired state.
Note: Each instruction allows you to choose a High or Low input/output. For all input instructions, High triggers the state of the instruction and Low disables the state of the instruction. For all output instructions, Low triggers the state of the instruction and High disables the state of the instruction. If you have a triggered instruction, Cirris recommends adding the same I/O instruction with the opposite High or Low setting in the opposite I/O Instruction Block (i.e. Good Test is opposite of Bad Test). For example, if you have a Low output instruction when a test is “Good”, that instruction will keep its state/value when a test is “Bad” unless you have a High output instruction in the “Bad Test” I/O Instruction Block that disables the Low output instruction.
I/O Instruction Blocks
This box contains tabs that represent the test events in a test cycle where the available I\O instructions listed above can be used. The tabs are as follows:
| I/O Instruction Block Test Events | |
|---|---|
| Test Event Name | Description |
| Initialize | Instructions in this block configure the hardware and software for the state the tester should be in at the time of opening a test session with a new Test Program or just before a new test when no device is attached. Guidelines for using the .Initialize I/O Instruction block: Set the outputs you are going to use to a known .resting state, Define the resting state of inputs (voltage levels). |
| Cable Attached | The tester sensed a connection between 2 or more test points. |
| Cable Removed | The tester sensed the cable is removed. |
| Ready to Test | The tester is ready to test; the cable may or may not be attached. |
| Start Test | Instructions in this block will be executed when the test is started. |
| LV Test Passed | The low-voltage test passed. |
| LV Test Failed | The low-voltage test failed. |
| HV Test Started | The tester started the high-voltage test. |
| HV Test Passed | The high-voltage test passed. |
| HV Test Failed | After the high-voltage test failed. |
| Will Count Good | If the cable were removed, it would count as “Good”. |
| Will Count Bad | If the cable were removed, it would count as “Bad”. |
| Good Test | Instructions in this block are performed after a good low voltage and high voltage test. |
| Bad Test | Instructions in this block are performed when a test is bad. |
Save as System Default
This button allows you to save the current test’s information to System Defaults. Later when editing this or another test program, you can restore the settings set when this button is clicked.
Add New Instruction
This button allows you to add a new I/O instruction or a Windows Message to the “I/O Instruction Blocks” list. When adding a new instruction or message, you will be taken to a window that matches the type of instruction selected in the “Available I/O Instructions” block. The I/O instruction types include: WaitForInput, SetOutput, SetButtonOnInput, LoadTestOnInput. The Windows Message types include: WaitForMessage,PostMessage, SetMessagesButton, LoadTestOnMessage.
To add a new instruction:
- Click the appropriate tab of the I/O Instruction Block.
- Click on one of the instructions listed in the tab you selected.
- Under “Available I/O Instructions”, click the tab and instruction type you want to insert.
- Click Add New Instruction.
- In the dialog box that opens, configure and save the new instruction.
Change Selected Instruction
This button allows you to change an instruction.
- In the I/O Instruction Block list, select the desired instruction type.
- Click Change Selected Instruction.
- In the dialog box that opens, configure and save instruction.
Import I/O from a File
This button allows you to import I/O Information from a previously exported test program.
- Click Import I/O from a File.
- Browse to the file location, select (highlight) the file, and click Open.
- Click Import. The I/O information will be imported to the current test program.
Delete Selected Instruction
This button allows you to delete a highlighted instruction from the I/O instruction blocks.
- In the I/O Instruction Blocks, click the tab and then the instruction type you want to delete.
- Click Delete Selected Instruction.
Go to: